Blink 2 LEDs Program | IoT Project Code & Circuit Explained
Q. Write a program to blink 2 LEDs with a delay of 2 seconds.
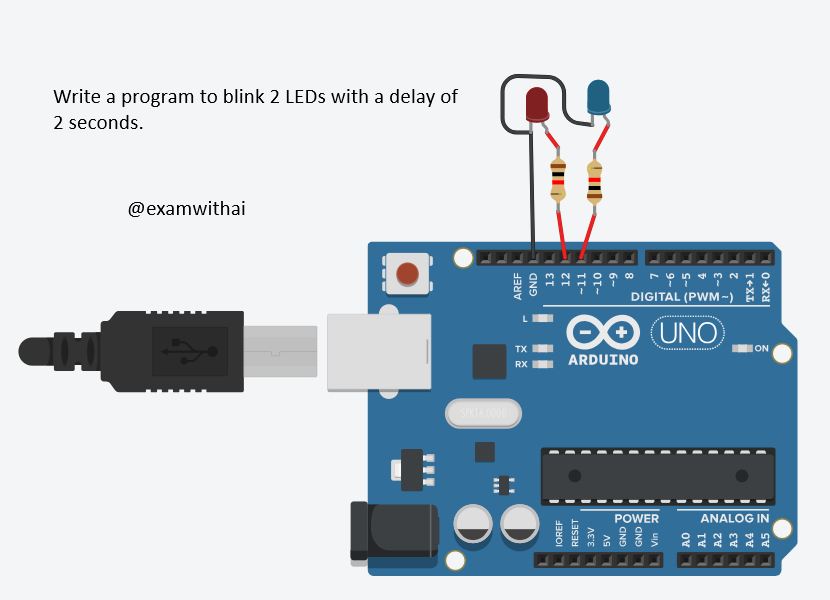
This is the important program in O Level Module 4 — IOT Practical — that makes two LEDs blink alternately. One LED is connected to pin 12, and the other to pin 8 of the Arduino board. Each LED stays ON for 2 seconds, then turns OFF as the other turns ON.

So, let’s start this program. Here is the image what we want to make
Variable Declaration
//
int led1 = 12;
int led2 = 11;- Define Both LEDs with name e.g led1 and led2
- Pins are integer data type values, so we have added int.
Setup Function
//
void setup()
{
pinMode(led1, OUTPUT);
pinMode(led2, OUTPUT);
}- The
setup()function runs once when the Arduino starts or resets. pinMode(pin, OUTPUT)configures a pin so that it can send voltage (to light up an LED).- led1 and led2 are set as OUTPUT.
Also Read: Write a program to blink 5 LEDs in serial mode with a delay of 2 seconds.
Loop Function
//
void loop()
{
  digitalWrite(led1, HIGH);   // Turn ON LED connected to pin 12
  delay(2000);              // Wait for 2 seconds (2000 milliseconds)

  digitalWrite(led1, LOW);    // Turn OFF LED on pin 12
  digitalWrite(led2, HIGH);    // Turn ON LED on pin 11
  delay(2000);              // Wait for 2 seconds

  digitalWrite(led2, LOW);     // Turn OFF LED on pin 11
}
CODE
//
int led1 = 12;
int led2 = 11;
void setup()
{
pinMode(led1, OUTPUT);
pinMode(led2, OUTPUT);
}
void loop()
{
  digitalWrite(led1, HIGH);
  delay(2000);
  digitalWrite(led1, LOW);
  digitalWrite(led2, HIGH);
  delay(2000);
  digitalWrite(led2, LOW);
}- The
loop()function runs continuously aftersetup(). digitalWrite(pin, HIGH)turns the LED ON by sending 5V to the pin.digitalWrite(pin, LOW)turns the LED OFF.delay(2000)pauses the program for 2 seconds.
How It Works in Steps:
- LED 1 ON (Pin 12) → wait 2 seconds
- LED 1 OFF, LED 2 ON (Pin 11) → wait 2 seconds
- LED 2 OFF
- Loop back to step 1


